The necessity of transferring files has always been of the utmost importance in all IT domains, so making sure the process is secure, easy, and clean is a top priority.
There are multiple ways of transferring files on Linux operating systems. This guide will explore how to transfer files locally and remotely using cp and rsync commands. Here is the table of contents:
- Transfer Files Locally
- Transfer Files to and from a Remote Linux Host Using a SSH Password
- Transfer Files to and from a Remote Linux Host Using a SSH Key
- Conclusion
Transfer Files Locally
The most straightforward tool for transferring files and folders is cp. You can easily duplicate files using cp. It also has a list of arguments for several additional actions. The simplest format is cp file destination_folder/
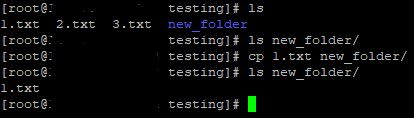
The new_folder folder was empty, and I copied the 1.txt file in it. You can check other features using cp --help.
For more complex operations, you should use rsync. rsync is a quick and incredibly versatile file copying tool. It can copy files and folders locally and remotely using the remote shell. It offers many options that control every aspect of its behavior and permit very flexible specifications of the set of files to be copied.
Chances are rsync is already installed on your Linux distro, but here are instructions to install it for your environment anyways:
Fedora, RedHat, CentOS: sudo dnf install rsync grsync or sudo yum install rsync grsync
Ubuntu, Debian: sudo apt install rsync grsync or sudo apt-get install rsync grsync
OpenSUSE: sudo dnf install rsync grsync
Arch Linux: sudo pacman -S rsync grsync
Let’s imagine we need to recursively transfer the data (files and subfolders) from one folder to another folder. We can use:
$ rsync -ravz source destinationIn our case:
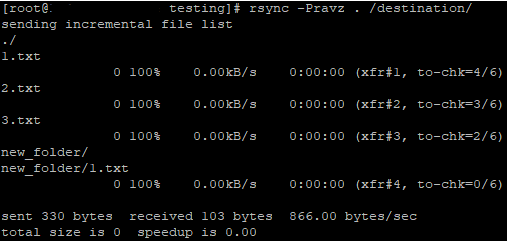
$ rsync -ravz . /destination/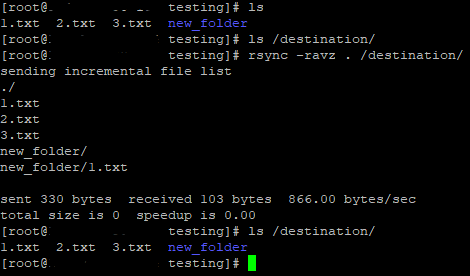
So our source is . (meaning the current path) and our destination is the /destination folder. The command could also have been rsync -ravz /testing /destination. So what do the arguments ravz stand for?
-r, --recursive             recurse into directories
-a, --archive               archive mode
-v, --verbose               increase verbosity
-z, --compress              compress file data during the transfer
When you have large files, it can be helpful also to use the P argument, which will show the progress during transfer.
If rsync determines that the contents of the source and destination paths are identical, no files will be transferred. This means the source and destination folders are synced.

Let’s test this by removing a file from the destination folder:
$ rm -f /destination/2.txt
$ rsync -Pravz . /destination/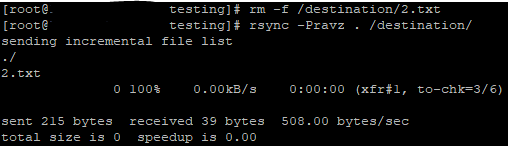
As you can see, rsync notices the 2.txt file is missing, and it transfers just that.
All the text files are empty. Let’s add a line in one of them and see what happens when we rerun the same command:
$ echo "some content" > 2.txt
$ rsync -Pravz . /destination/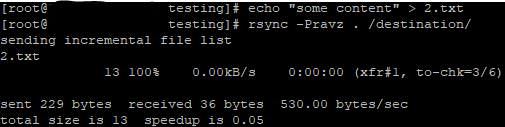
rsync notices the source and destination 2.txt files are different and transfers the source one, overwriting the destination one. As you can see, it asks for no confirmation for the overwrite action, so make sure you are extra careful when planning the operation.
Transfer Files to a Remote Linux Host Using an SSH Password
The fun part is when you need to transfer files to another Linux server. rsync uses the notorious SSH (Secure Shell) protocol to perform this action.
There are some prerequisites to be able to transfer files via SSH.
First, you need to know the SSH port. The default SSH port is 22, but it’s a good practice to use a different port, security-wise.
Second, you need access – a user name and password or SSH key. And third, the connection must be permitted in both servers’ firewalls.
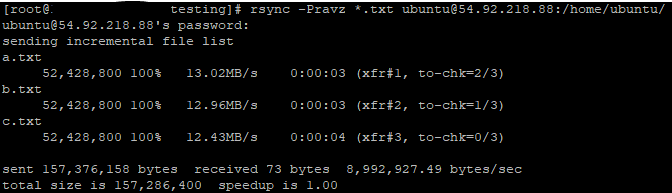
I will generate three 50 MB files containing random data for this example. You can find out more about generating random data in this tutorial.
$ for i in {a..c}; do dd if=/dev/urandom of=$i.txt bs=10M count=5; done
$ ls -alh
total 151M
drwxr-xr-x   2 root root 4.0K Jan 24 10:35 .
dr-xr-x---. 18 root root 4.0K Jan 23 22:11 ..
-rw-r--r--   1 root root  50M Jan 24 10:36 a.txt
-rw-r--r--   1 root root  50M Jan 24 10:36 b.txt
-rw-r--r--   1 root root  50M Jan 24 10:36 c.txt
I now have three files called a.txt, b.txt and c.txt, each having the size of 50 MB. Let’s transfer them to another server.
I know the IP address of the server. It’s 54.92.218.88, the user name is ubuntu and the SSH port is the standard 22. The command should look like this:
$ rsync ARGUMENTS source username@IP_Address:destinationSo the command should be:
$ rsync -Pravz *.txt ubuntu@54.92.218.88:/home/ubuntu/This will transfer all .txt files in my current path to the /home/ubuntu/ path on 54.92.218.88, after I enter the password for the ubuntu account on the remote server 54.92.218.88.

Checking on the remote server:
$ ls -hl /home/ubuntu/
Let’s do it the other way around. I will remove the text files I generated and transfer them back from the remote server.
$ rm -f a.txt b.txt c.txt
$ rsync -Pravz ubuntu@54.92.218.88:/home/ubuntu/*.txt /root/testing/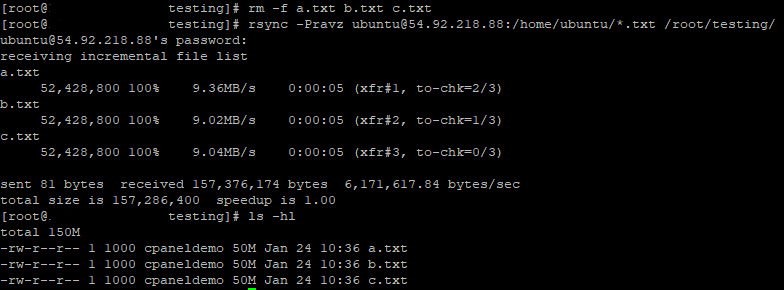
As you can see, the files are back, and there are also some excellent statistics, the transfer rate and time for each file, the transfer rate and time for the entire operation, the size of the transferred files, etc.
If we are facing a non-standard SSH port, we need to add -e 'ssh -p PORT_NUMBER' to the command.
I will change the SSH port to 2022 on the remote server by editing the /etc/ssh/sshd_config file and restarting the sshd service:
$ sudo nano -w /etc/ssh/sshd_config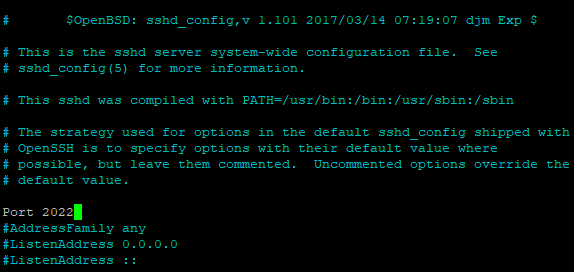
$ sudo service sshd restart
Now, the command will look like this:
$ rsync -Pravz -e 'ssh -p 2022' *.txt ubuntu@54.92.218.88:/home/ubuntu/
As you can see, no files were transferred because I already have the duplicate files on the remote host. That’s the advantage of syncing over other actions like blindly copying.
I will now modify a local file and reissue the rsync command:
$ echo "Hello!" > a.txt
$ rsync -Pravz -e 'ssh -p 2022' *.txt ubuntu@54.92.218.88:/home/ubuntu/
rsync compares the files, notices my a.txt source file is different than the destination one, and it overwrites the remote a.txt file. The other two files are still the same, so they are not transferred.
Transfer Files to and from a Remote Linux Host Using an SSH Key
Say you don’t want to use an SSH password. I’m with you on this one—no need to go into the reasons here.
Wikipedia explains very well the SSH key-based connection: “When the public-private key pair is generated by the user manually, the authentication is essentially performed when the key pair is created, and a session may then be opened automatically without a password prompt. In this scenario, the public key is placed on all computers that must allow access to the owner of the matching private key, which the owner keeps private. While authentication is based on the private key, the key is never transferred through the network during authentication. SSH only verifies that the same person offering the public key also owns the matching private key.”
Let’s generate an SSH key pair on our source server:
$ ssh-keygen -f ~/.ssh/transfer -q -P ""This command will generate two files, ~/.ssh/transfer, which is the private key and ~/.ssh/transfer.pubThe public key. The public key looks like this:

We now need to put this public key into the ~/.ssh/authorized_keys of the destination server.
I will generate the fourth file, d.txt:
$ dd if=/dev/urandom of=d.txt bs=10M count=5and then issue this long command:
$ rsync -avz -e "ssh -p 2022 -o StrictHostKeyChecking=no -o UserKnownHostsFile=/dev/null -i ~/.ssh/transfer" --progress d.txt ubuntu@54.92.218.88:/home/ubuntu/We mentioned the custom 2022 SSH port and the newly created private key, ~/.ssh/transfer and the transfer takes place without the need to enter a password.

Conclusion
I’ve shown you a very straightforward way of transferring files to and from a remote Linux host. As I mentioned at the beginning of this tutorial, there are multiple ways of performing this task, scp is also an adequate tool for this, but getting the insights of the entire operation provides you the basic knowledge from which you can construct the solution for any scenario which involves files transfer.
Learn also: How to Get All System and Hardware Info in Linux.
