Linux operating systems are used mostly for servers and server-side applications. Knowing the hardware capabilities, components and compatibility is essential for any system administrator, developer, or DevOps engineer. All right, you may know the number of CPU cores, how many GBs of RAM and disk space the server offers, but we can go deeper.
Here is the table of contents of this tutorial, feel free to skip to what you need:
- Introduction
- Know your System
- CPU Information
- RAM Information
- Storage Information
- Network Information
- GPU Information
- Conclusion
Introduction
Sometimes you need to know the CPU architecture, the RAM generation, and frequency, disk drive(s) model, and speed. Or maybe you just want to check if the server you just rented has the provider’s advertised specifications. In the next minutes, you will learn how easily you can acquire all this info.
A nice, powerful tool is lshw. You can have it on all popular Linux distributions. If you are using a superuser (root), you need to remove sudo from the commands.
CentOS and Fedora:
$ sudo dnf install lshw -yUbuntu, Debian, and Mint:
$ sudo apt-get install lshw -yOpenSUSE uses zypper:
$ sudo zypper install lshwand Arch Linux:
$ sudo pacman -S lshwGreat, dissecting your Linux host is one step away. Simply running sudo lshw will provide all the info there is to know, but the output’s structure will surely scare you away, as there is just an avalanche of information on your screen.
Let’s bring some order to all this chaos by running sudo lshw -short. I will use three types of servers to demonstrate this tutorial – a HPE enterprise-grade dedicated server, a personal computer used as a server, and a virtual server (an AWS EC2 instance).
The above-mentioned command will structure the output into different classes:
Know your System
The most important classes are system, processor, memory, network, storage, disk and volume. You can specify the class you are interested in with the -c argument. Let’s see our systems:
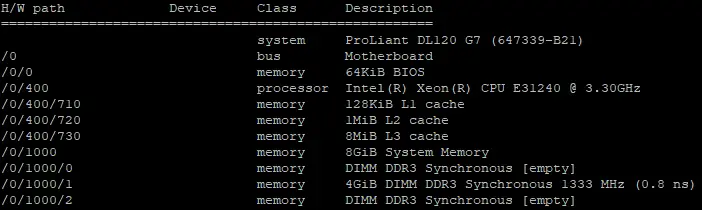
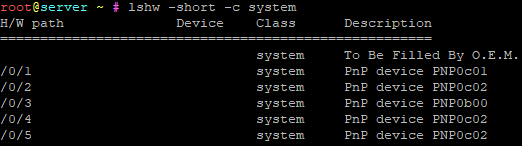
$ lshw -short -c systemHPE server:

Personal computer:
Virtual server – AWS EC2 t3a.micro instance:

Another essential piece of information you absolutely need is the operating system. This piece of information, along with the kernel version, can be found by running:
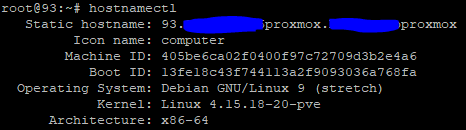
$ hostnamectl
# Output from the AWS EC2 instance
   Static hostname: ip-172-31-77-43.ec2.internal
         Icon name: computer-vm
           Chassis: vm
        Machine ID: 4d78db4a684b6f64404255df88b2c437
           Boot ID: 0d63f13309de479c8a9ca5a1fef94130
    Virtualization: kvm
  Operating System: CentOS Linux 8 (Core)
       CPE OS Name: cpe:/o:centos:centos:8
            Kernel: Linux 4.18.0-193.19.1.el8_2.x86_64
      Architecture: x86-64
We can see we are running a 64-bit version of CentOS 8 and the kernel version is 4.18.0-193.19.1.el8_2.x86_64.
On the personal computer, I am running a 64-bit version of Debian 9 having a 4.15.18-20-pve kernel version:
CPU Information
Good, we know our basis, let’s get to know our main actor, the CPU. We can meet him by running:
$ sudo lshw -short -c processor


You can see the CPU for the HPE server, the personal computer, and, respectively, the EC2 instance. The -short argument will not help us here, let’s get rid of it and use:
$ sudo lshw -c processor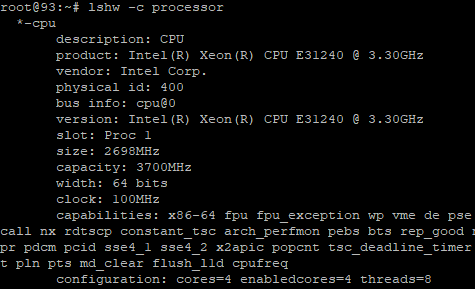
The HPE server runs on a 64 bits architecture Intel Xeon E3-1240 CPU, 4 cores, 8 hyperthreads which can each reach 3700 MHz.
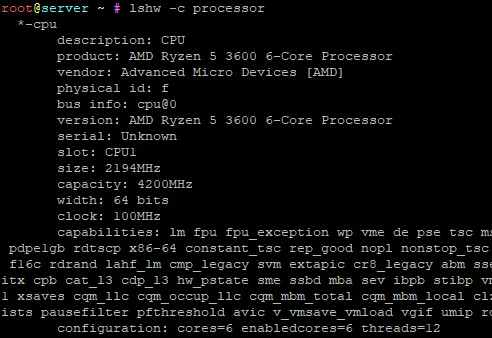
The personal computer is fueled by a 64 bits AMD Ryzen 5 3600 which offers 6 physical cores and 12 hyper-threads capable of running at a 4200 MHz frequency.
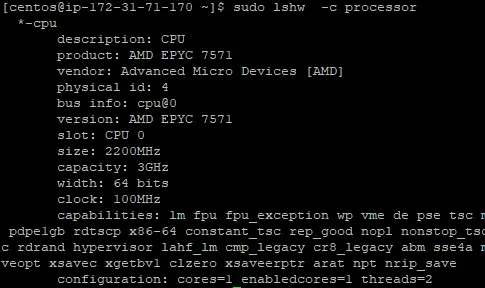
The EC2 t3a.micro instance offers just 1 core and 2 hyper-threads from the AMD EPYC 7571 CPU with a maximum frequency of 3 GHz.
You may want to know the CPU temperature. This interesting info can be retrieved using the sensors command, part of the lm_sensors / lm-sensors package.
CentOS, Red Hat, or Fedora:
$ sudo yum install lm_sensorsDebian, Ubuntu, and Mint Linux:
$ sudo apt-get update
$ sudo apt-get install lm-sensors
You can additionally run sudo sensors-detect in order to know the sensors installed on the server. Simply run sensors.
My HPE server shows the following info:
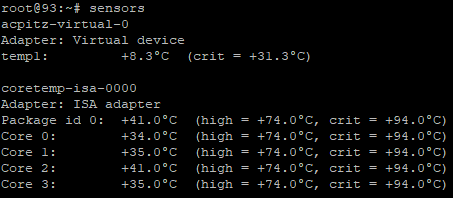
The 4 physical CPU cores have temperatures between 34 and 41 Celsius degrees.
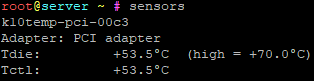
The personal computer does not offer much info:
While the virtual server from AWS offers no info at all:
$ sudo sensors
No sensors found!
Obviously, displaying this hardware info can be hindered for virtualized servers.
If you still require additional info regarding the server’s CPU, you can try:
$ cat /proc/cpuinfo
RAM Information
Moving on, we will look at RAM (Random Access Memory).
Three things are important – Size, Generation and Frequency.
Let’s look at them using:
$ sudo lshw -short -c memoryThe HPE server:
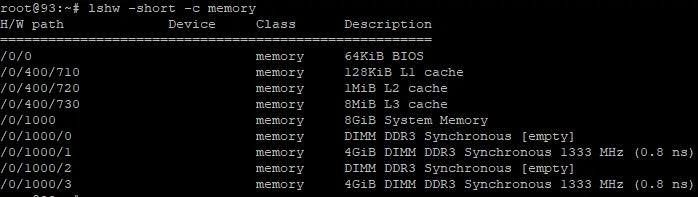
It contains 2 x 4 GB DDR3 DIMMs (dual in-line memory module, commonly called a RAM stick) which run at 1333 MHz (frequency). As you can see, the total available memory is 8 GB.
The personal computer:
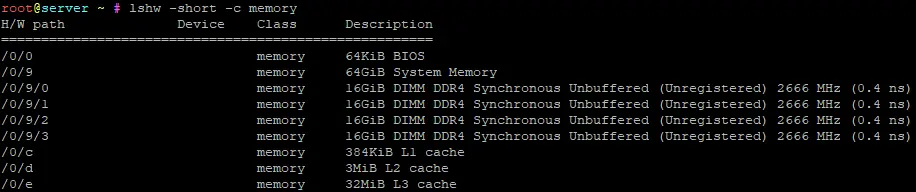
It comes with 4 x 16 GB DDR4 DIMMs running at 2666 MHz. The total memory size is 64 GB. Please note the newer DDR generation and double frequency.
The EC2 virtual server:

It has 1 x 1 GB DDR4 DIMM allocated, running at 2667MHz.
Storage Information
Next, we’ll take a look at the storage components. I’ll explain the three categories I’ve mentioned in the introduction of this tutorial:
- The
storageclass refers to the controllers on the motherboard – ATA or RAID controllers. - The
diskclass refers to the physical or virtually exposed disks drives. - The
volumeclass refers to the volumes created on the disk(s).
You can combine multiple classes on a single command:
$ sudo lshw -short -c storage -c disk -c volume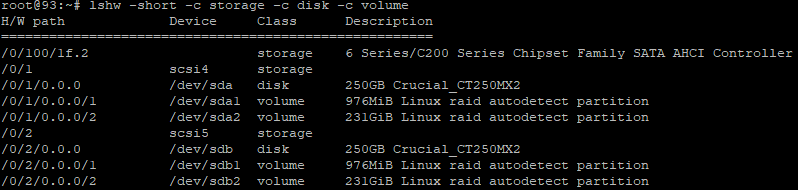
The HPE server comes with a SATA AHCI controller, two 250 GB Crucial SSDs are connected, and two volumes are created on each disk, 976 MB and 231 GB. The volume configuration is the same on each disk because they are part of a RAID 1 array.
A virtual server will not present the real hardware details, but the emulation details:

AWS shows even less info:

Network Information
The network class provides details on the connected network interfaces. To list available network interfaces, use:
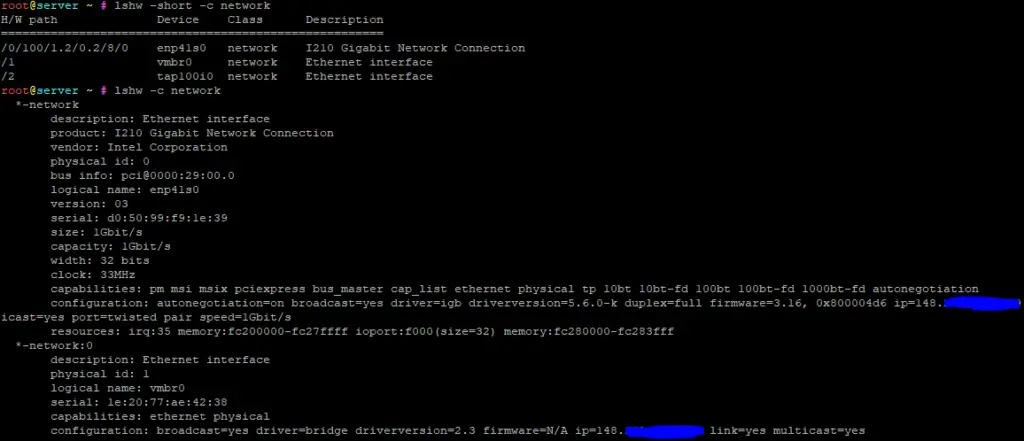
$ sudo lshw -short -c networkBelow generates more extended info on each network interface, including vendor, model, serial or MAC address, connectivity capacity, capabilities, the configured IP addresses, driver and firmware versions:
$ sudo lshw -c networkOutput:
Again, this info is truly accurate only on physical servers. An AWS EC2 instance outputs the following data:
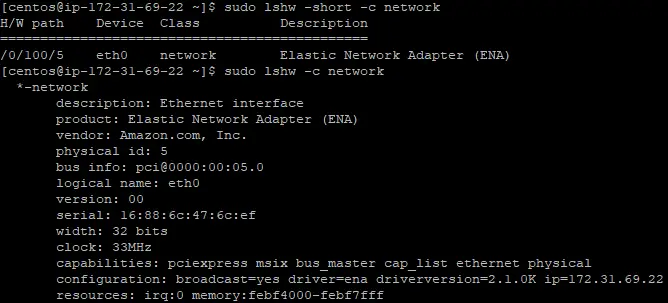
The serial (MAC address) is embedded in the network card by the manufacturer, but can easily be temporarily modified by any operating system.
Please note that regardless of the network interface’s capability, the server provider (if you are renting the server) or the Internet service provider can always limit the available bandwidth. So, having a 1 Gbit/s connection won’t guarantee you will reach this download/upload speed.
GPU Information
The video card is also a component that may interest you. Check it using:
$ sudo lshw -c video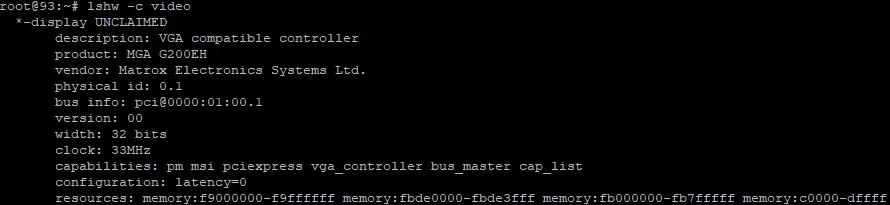
I have a Matrox G200EH video card, but the memory size is not displayed. Unfortunately, lshw does not provide this piece of information. For this, you can install the mesa-utils package which contains the glxinfo tool:
$ sudo apt-get install mesa-utils -y
$ sudo glxinfo -B
...
Extended renderer info (GLX_MESA_query_renderer):
    Vendor: Intel (0x8086)
    Device: Mesa Intel(R) HD Graphics 5500 (BDW GT2) (0x1616)
    Version: 20.2.6
    Accelerated: yes
    Video memory: 3072MB
    Unified memory: yes
    Preferred profile: core (0x1)
    Max core profile version: 4.6
    Max compat profile version: 4.6
    Max GLES1 profile version: 1.1
    Max GLES[23] profile version: 3.2
...
There you have it – Video memory: 3072MB
Conclusion
Done! You now know how to check all important components of a Linux server.
You can now evaluate if the server’s configuration is adequate for your needs, for your application(s), and estimated traffic.
Asking a server provider to provide the output of some of all of these commands before renting a server will spare you a lot of headaches caused by hardware inconsistencies that may arise in the presale discussions.
